
Your small home, balcony, or patio can become a hub of sustainable living, starting with how you manage kitchen waste. Food scraps, often destined for landfills, possess incredible potential to enrich your garden and reduce your environmental footprint. Landfills release methane, a potent greenhouse gas, as organic materials decompose without oxygen. Composting diverts this waste, transforming it into a valuable resource.
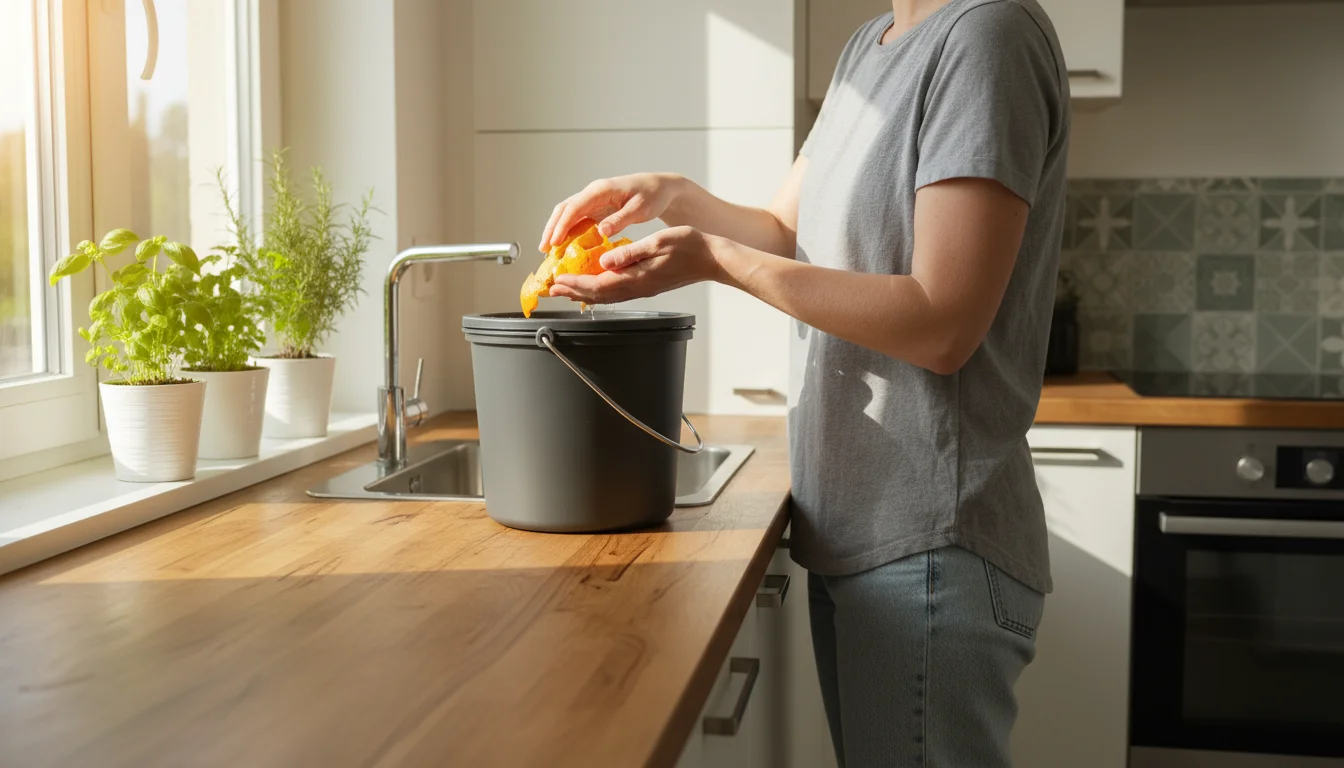
Imagine turning your kitchen waste into nourishing soil for your container plants or urban garden, all without outdoor space, foul odors, or complicated setups. This guide introduces you to bokashi composting, a revolutionary indoor composting method perfectly suited for small-space living. You gain a practical, efficient, and clean way to manage your food scraps right inside your home. It empowers you to make a tangible difference, turning everyday waste into a valuable asset for your gardening endeavors.
For research-based sustainable gardening guidance, see
Cornell Waste Management Institute — Composting,
UF/IFAS Gardening Solutions — Florida-Friendly Landscaping and
The Xerces Society — Pollinator Conservation.
Disclaimer: This article is for informational purposes only and is not a substitute for professional advice. Check local regulations before installing rain capture, using greywater, or composting food scraps outdoors.
The Secret to Small-Space Composting: Why Indoor Composting Works
Many urban dwellers believe composting requires a sprawling backyard and a large, smelly pile. This misconception prevents countless households from engaging in one of the most impactful sustainable practices: diverting organic waste from landfills. The truth is, effective composting is accessible to everyone, regardless of your living situation.
Indoor composting offers a solution for apartment dwellers, those with small patios, or anyone lacking traditional outdoor composting space. It transforms food scraps into a valuable resource for your plants, reducing waste and enriching your soil. Beyond the environmental benefits, it connects you more deeply with the lifecycle of your food, fostering a greater appreciation for resourcefulness.
Traditional outdoor composting methods, while effective, often pose challenges for small spaces. They can require specific carbon-nitrogen ratios, frequent turning, and produce odors or attract pests if not managed meticulously. These requirements deter many potential composters, leading to continued reliance on waste disposal systems that negatively impact our planet. The EPA estimates that food waste represents the largest component of municipal solid waste sent to landfills, accounting for about 24 percent of the total.
This is where `indoor composting` shines, offering a clean, contained process. Methods like vermicomposting (worm bins) and bokashi composting specifically address the constraints of indoor environments. They minimize odors, reduce pest attraction, and operate efficiently within compact areas. You contribute to a healthier planet by adopting these methods, turning what was once waste into a vital component of your home garden.
Bokashi composting, in particular, stands out for its simplicity and versatility. It processes a wider range of food scraps than traditional composting or even worm bins, including cooked foods, meat, and dairy. This makes it an incredibly practical choice for managing nearly all of your `small kitchen compost` waste, turning a significant portion of your daily discards into future plant nutrition.
Understanding Bokashi Compost: A Unique Fermentation Process
Bokashi composting represents a distinct approach to processing organic waste, differing significantly from traditional aerobic composting. The term “bokashi” comes from Japanese, meaning “fermented organic matter.” Instead of decomposition, bokashi utilizes an anaerobic (oxygen-free) fermentation process driven by a specialized blend of beneficial microorganisms, often referred to as Effective Microorganisms (EM).
These EM cultures typically include lactic acid bacteria, yeasts, and photosynthetic bacteria. When you introduce these microbes to food scraps in a sealed environment, they rapidly begin breaking down organic matter through fermentation. This process pickles the food waste, preserving its nutritional integrity rather than allowing it to rot. The result is “pre-compost,” a fermented material that still looks much like the original scraps but has undergone a significant transformation at a microbial level.
A key difference you notice immediately with `bokashi compost` is the smell. Unlike the earthy aroma of traditional compost or the unpleasant smell of rotting food, bokashi has a distinct, sweet-and-sour, pickled scent. This lack of putrid odor makes it ideal for `indoor composting` in kitchens, apartments, or other small spaces where offensive smells are unacceptable.
The fermentation process works quickly, typically taking about two weeks once the bokashi bucket is full and sealed. During this time, the beneficial microbes break down complex organic compounds into simpler forms, making nutrients more readily available when the pre-compost is eventually integrated into soil. This rapid transformation ensures a continuous cycle of waste processing, keeping your `small kitchen compost` stream flowing smoothly.
Benefits of Bokashi for Your Garden and Home
Choosing `bokashi compost` offers a wealth of advantages, particularly for urban gardeners and those prioritizing sustainable living in small spaces. The impact extends beyond simply diverting waste, enhancing your gardening efforts and promoting a healthier home environment.
Significant Waste Reduction: Bokashi composting directly addresses the problem of food waste. An average household produces a substantial amount of organic waste, and bokashi provides a simple mechanism to prevent these scraps from ending up in landfills. The Environmental Protection Agency (EPA) notes that food waste is a major contributor to methane emissions from landfills. By diverting your kitchen scraps, you actively reduce your household’s contribution to these harmful greenhouse gases. You transform a waste product into a valuable resource, making a tangible difference for the planet.
Nutrient-Rich Soil Amendment: The fermented bokashi pre-compost, while not finished compost, is incredibly beneficial for your garden soil. When you bury bokashi pre-compost in your garden beds or mix it into potting soil, the fermented material rapidly breaks down further, releasing a concentrated burst of nutrients. This process enriches the soil with readily available nitrogen, phosphorus, and potassium, essential for robust plant growth. It improves soil structure, enhances water retention, and provides a powerful boost to your plants’ health and vitality.
Production of “Bokashi Tea”: As your food scraps ferment in the sealed bucket, a liquid byproduct, often called “bokashi tea” or “fermentation leachate,” collects at the bottom. This liquid, rich in beneficial microbes and nutrients, serves as an excellent liquid fertilizer for your plants. You can dilute it (typically 1:100 or 1:50 with water) and use it to water your indoor plants, container gardens, or outdoor beds. This provides a gentle yet effective nutrient boost, supporting healthy growth from root to tip. Bokashi tea also acts as a natural drain cleaner, offering a dual benefit.
Improved Soil Health and Microbial Life: The beneficial microorganisms in bokashi bran do not just ferment your food scraps; they also inoculate your soil with a diverse array of healthy microbes. When you introduce bokashi pre-compost to your soil, these microbes continue their work, fostering a thriving soil ecosystem. This enhanced microbial activity leads to improved nutrient cycling, better disease resistance for your plants, and a more resilient overall garden environment. Healthy soil is the foundation of a productive garden, and bokashi directly contributes to its vitality.
Odor-Free and Pest-Resistant: A major advantage of `indoor composting` with bokashi is its virtually odor-free operation. The anaerobic fermentation process prevents the putrefaction that causes foul smells in traditional composting. The sealed nature of the bokashi bucket also deters common pests like fruit flies, rodents, and other scavengers. You can comfortably keep your bokashi bucket in your kitchen or any convenient indoor location without concerns about smells or unwanted visitors, making it a truly practical `small kitchen compost` solution.
By integrating `bokashi compost` into your routine, you move beyond simply disposing of waste. You actively participate in a regenerative cycle, transforming kitchen scraps into a valuable asset for your home, your garden, and the planet. This empowers you to cultivate greener habits and grow healthier plants, all from the comfort of your small space.
What You Can and Cannot Compost with Bokashi
One of the most appealing aspects of `bokashi compost` is its ability to process a wider range of organic materials compared to traditional composting methods or worm bins. Understanding what can and cannot go into your bokashi bucket ensures a successful fermentation process and avoids issues like foul odors or mold. This versatility makes it an excellent choice for managing almost all of your `small kitchen compost` waste.
Accepted Materials:
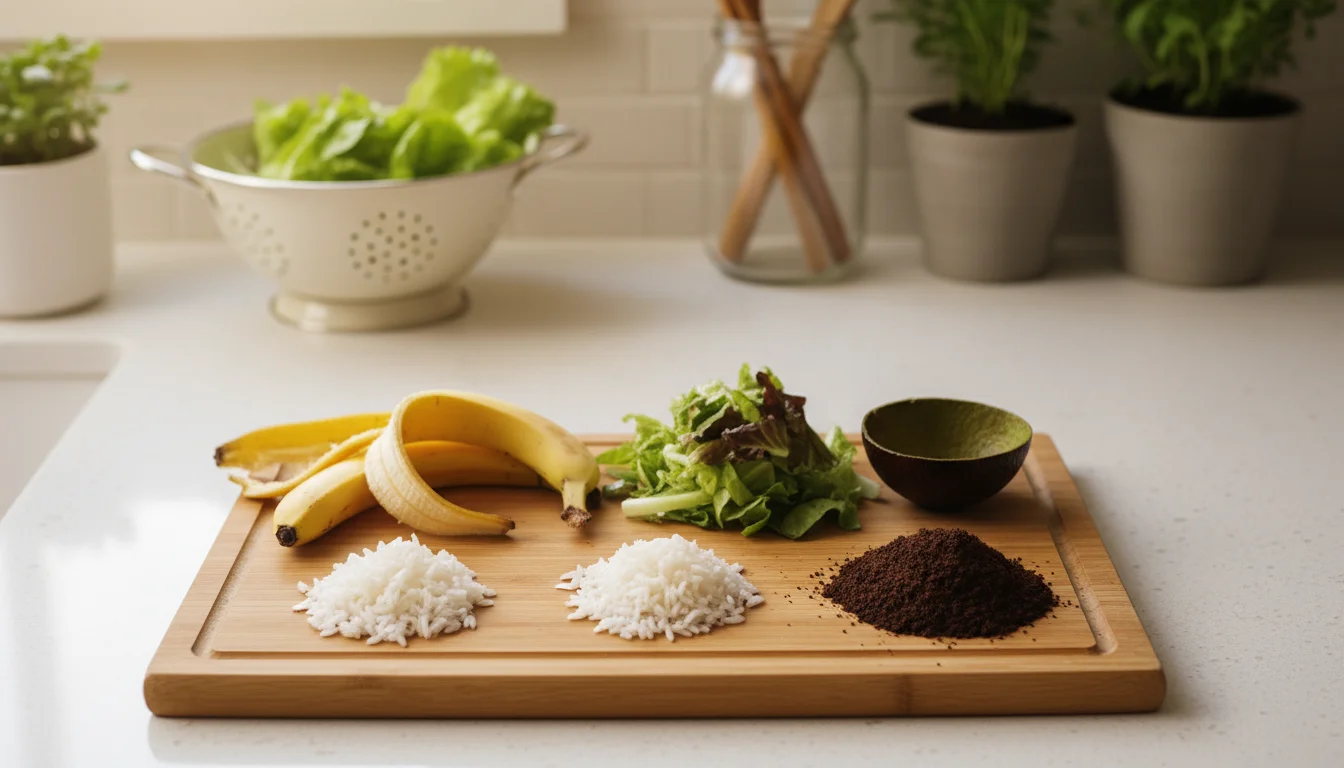
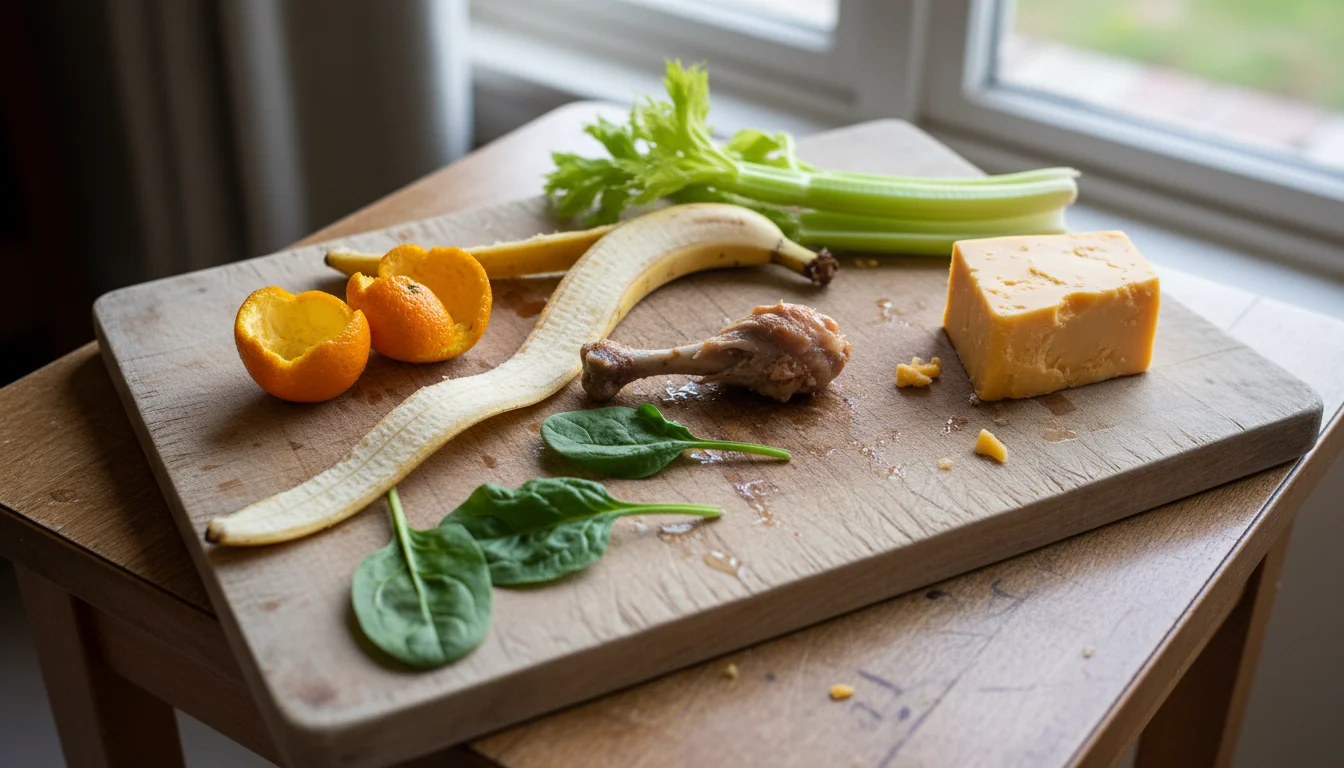
- All Cooked and Uncooked Food Scraps: This includes fruits and vegetables (peels, cores, scraps), bread, pasta, rice, grains, and baked goods.
- Meat and Fish: Cooked or raw meat scraps, bones (small ones are fine, large ones take longer to break down), fish skin and bones. This is a significant advantage over other indoor composting methods.
- Dairy Products: Cheese, yogurt, and other dairy waste are suitable for bokashi.
- Eggs: Eggshells and raw or cooked egg remnants.
- Coffee Grounds and Tea Bags: (Remove staples from tea bags).
- Small Amounts of Fats and Oils: While traditional composting struggles with excessive fats, bokashi can handle small quantities found on food scraps. Avoid pouring liquid fats directly into the bucket.
- Sauces and Condiments: Small amounts of leftover sauces or salad dressings.
The key to successful fermentation with these items is to chop them into smaller pieces. Smaller pieces offer a greater surface area for the bokashi microbes to work on, accelerating the fermentation process. Aim for pieces no larger than 1-2 inches (2.5-5 cm) for optimal results. Layering your scraps with bokashi bran and pressing them down tightly minimizes air pockets, which is crucial for the anaerobic process.
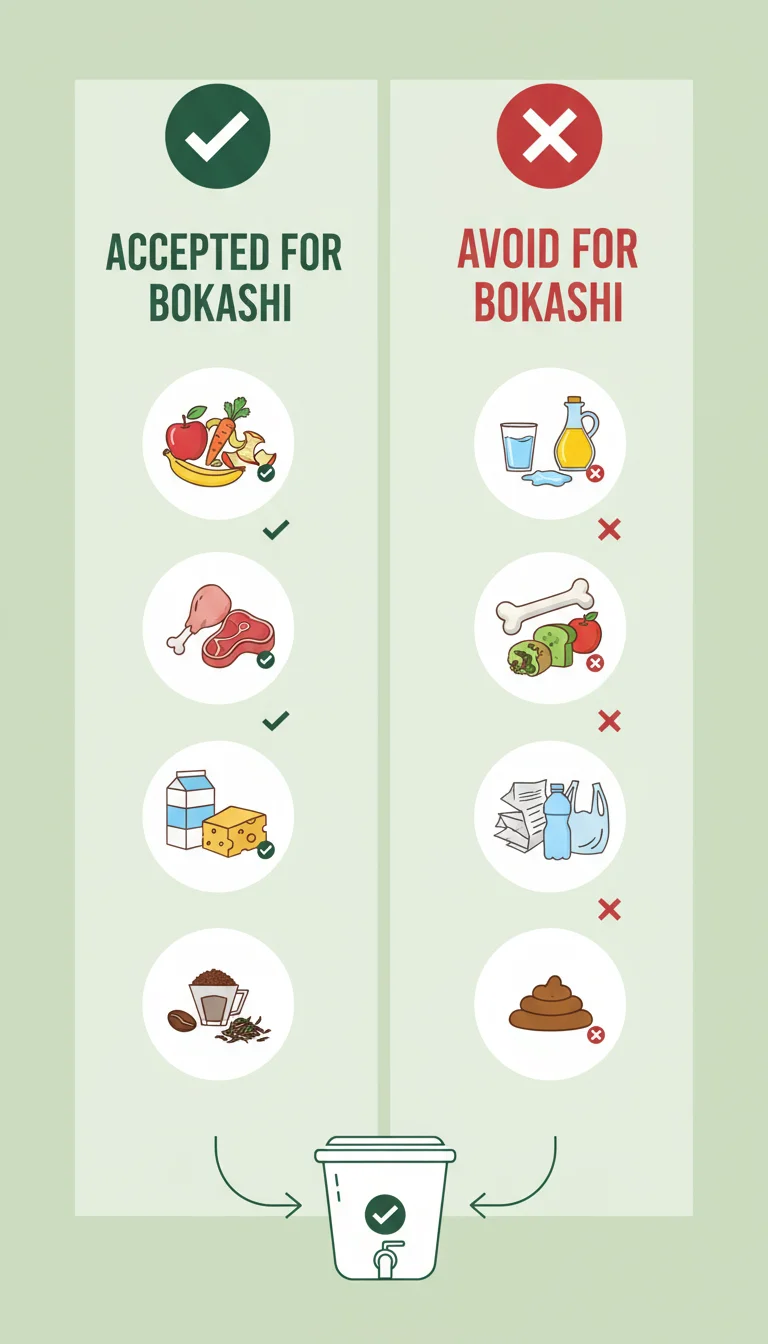
Materials to Avoid:
- Large Bones: While small bones ferment, very large bones take an extremely long time to break down in the subsequent soil phase.
- Excessive Liquids: Soups, juices, or large amounts of sauces can overwhelm the system and lead to a soggy, poorly fermented batch. Drain liquids before adding scraps.
- Moldy or Rotten Food (pre-existing): If food is already heavily spoiled or rotten before you add it to the bucket, it introduces competing microbes that can hinder the bokashi fermentation. Only add fresh scraps.
- Paper, Cardboard, Plastic, Glass: These are not organic food waste and will not ferment. Remove all non-food items.
- Ash: Wood ash can alter the pH and interfere with microbial activity.
- Pet Waste: While some composting systems handle pet waste, bokashi is not typically recommended for it due to potential pathogens, especially if you use the pre-compost on edible plants.
- Chemicals or Cleaning Products: These kill the beneficial microbes.
Carefully selecting your inputs significantly improves your bokashi experience. By sticking to the accepted materials and preparing them correctly, you ensure an efficient, odor-free fermentation that yields a valuable resource for your garden. This precision in sorting is a small effort that pays large dividends in your `indoor composting` success.
Setting Up Your Bokashi Bucket: A Step-by-Step Guide
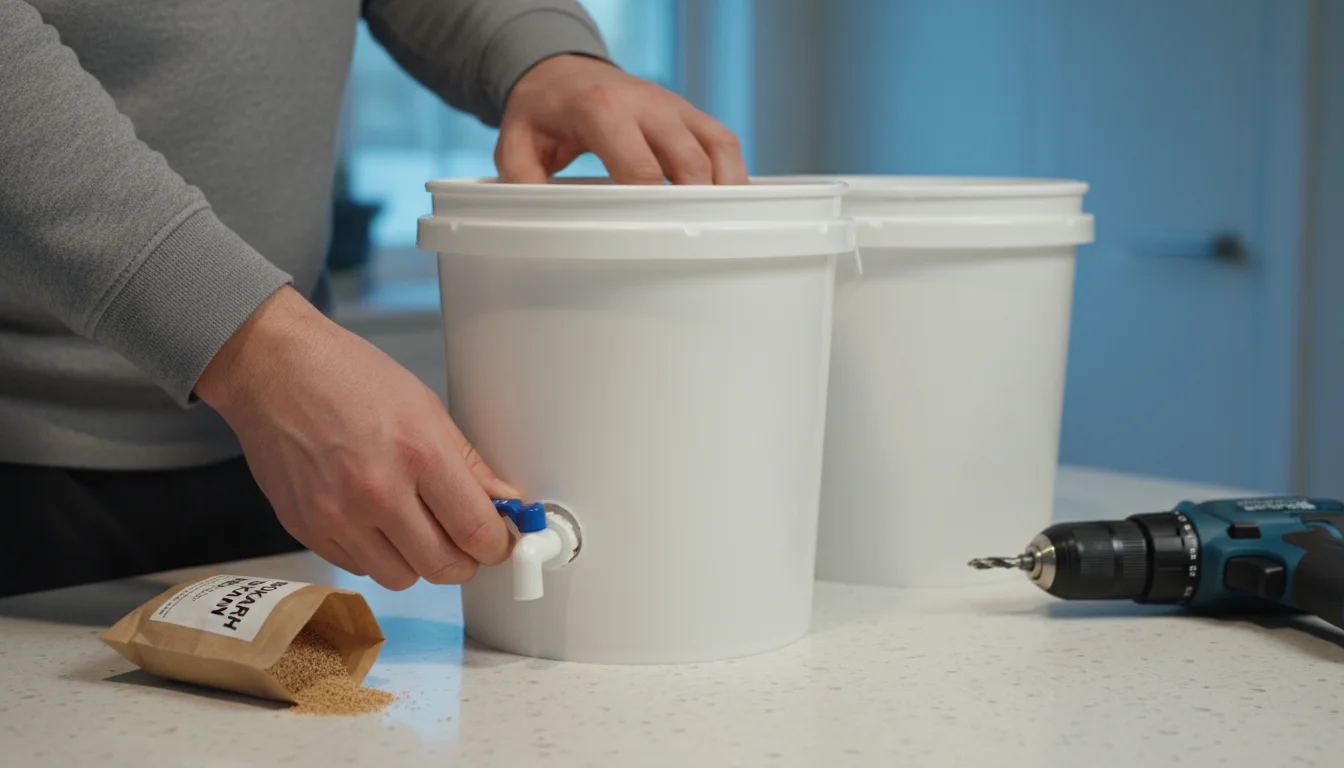
Starting your `indoor composting` journey with a bokashi bucket requires minimal setup and equipment. You can purchase a ready-made bokashi kit, which often includes two buckets for continuous composting, or you can create your own with a few simple items. The goal is to create an airtight, anaerobic environment that allows the beneficial microbes to thrive.
Materials You Will Need:
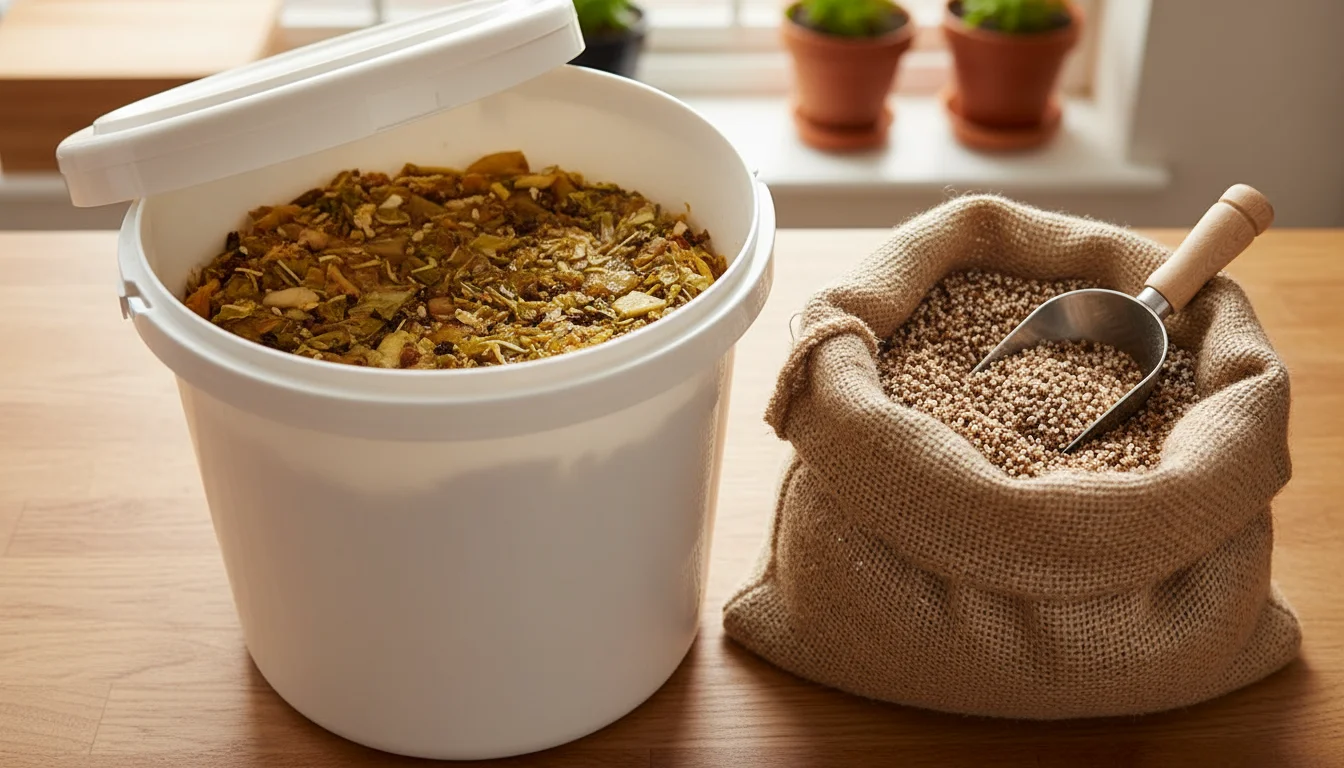
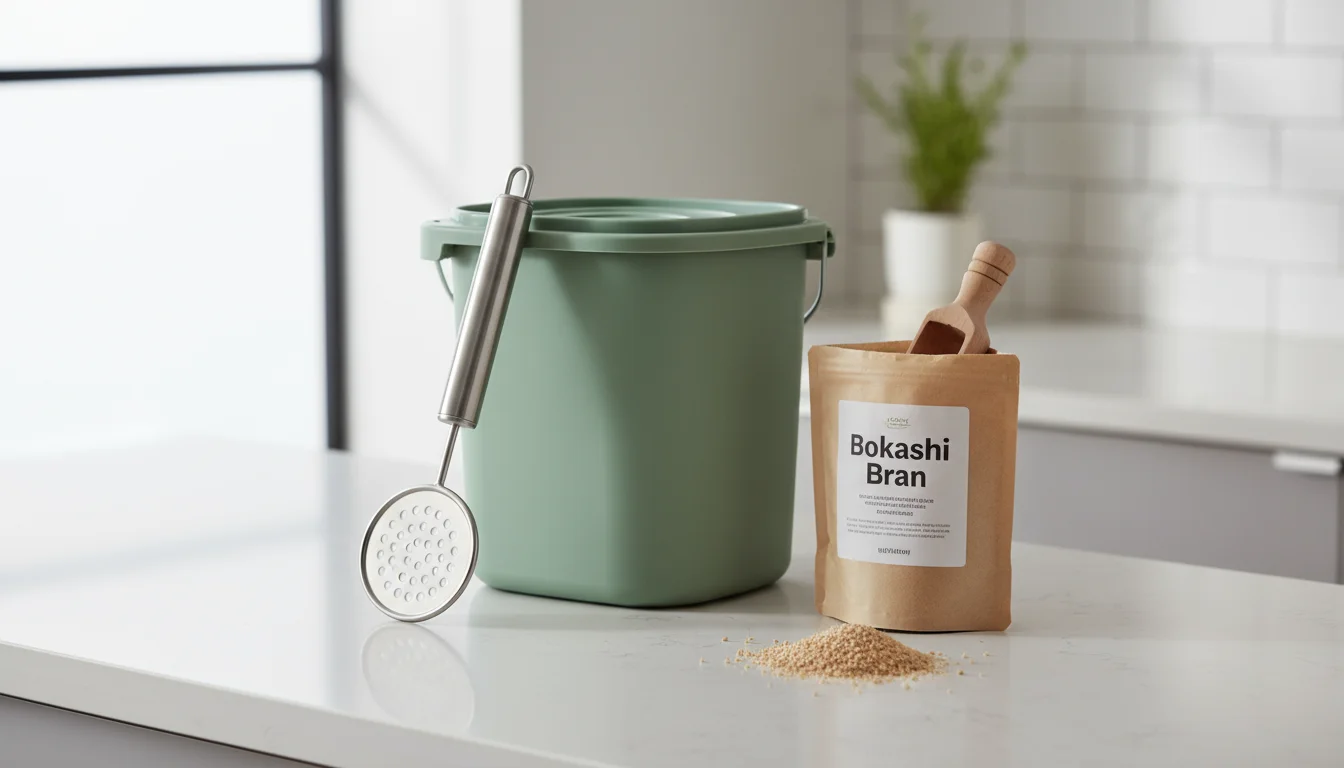
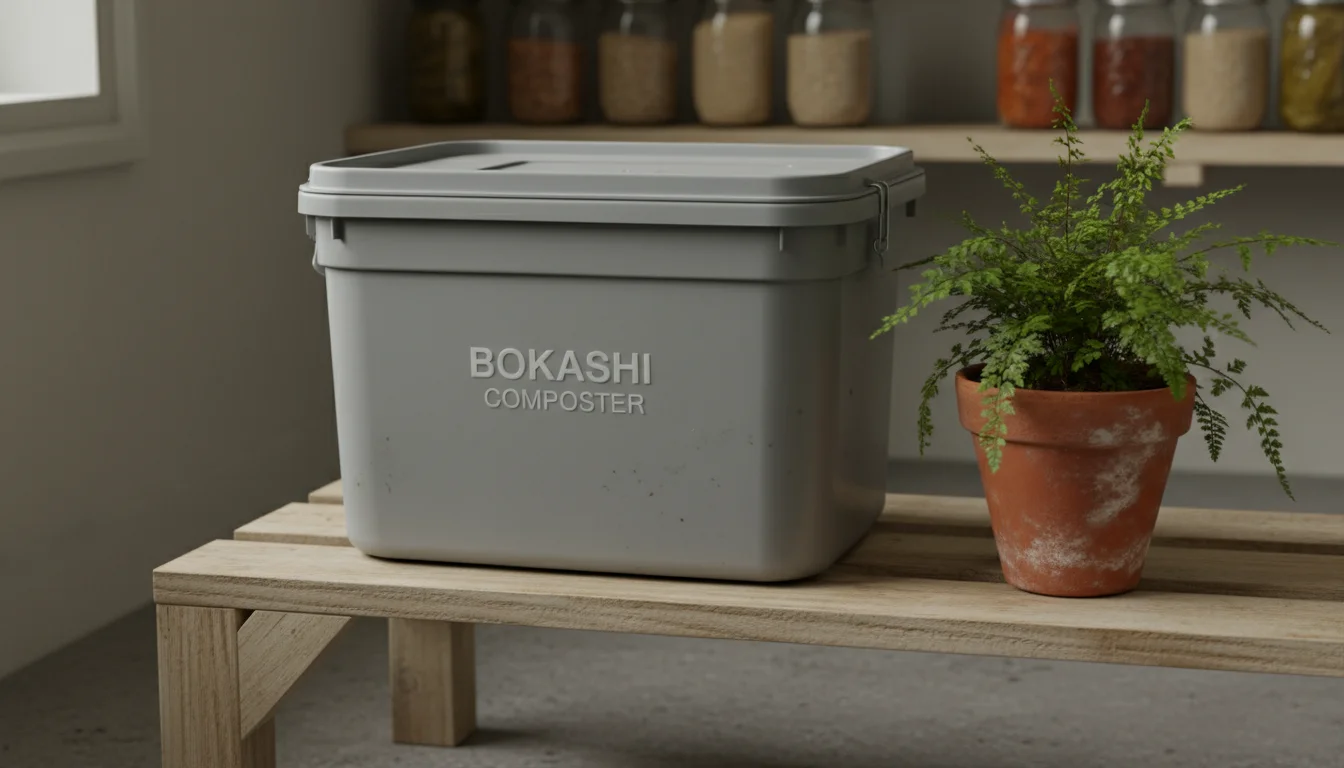
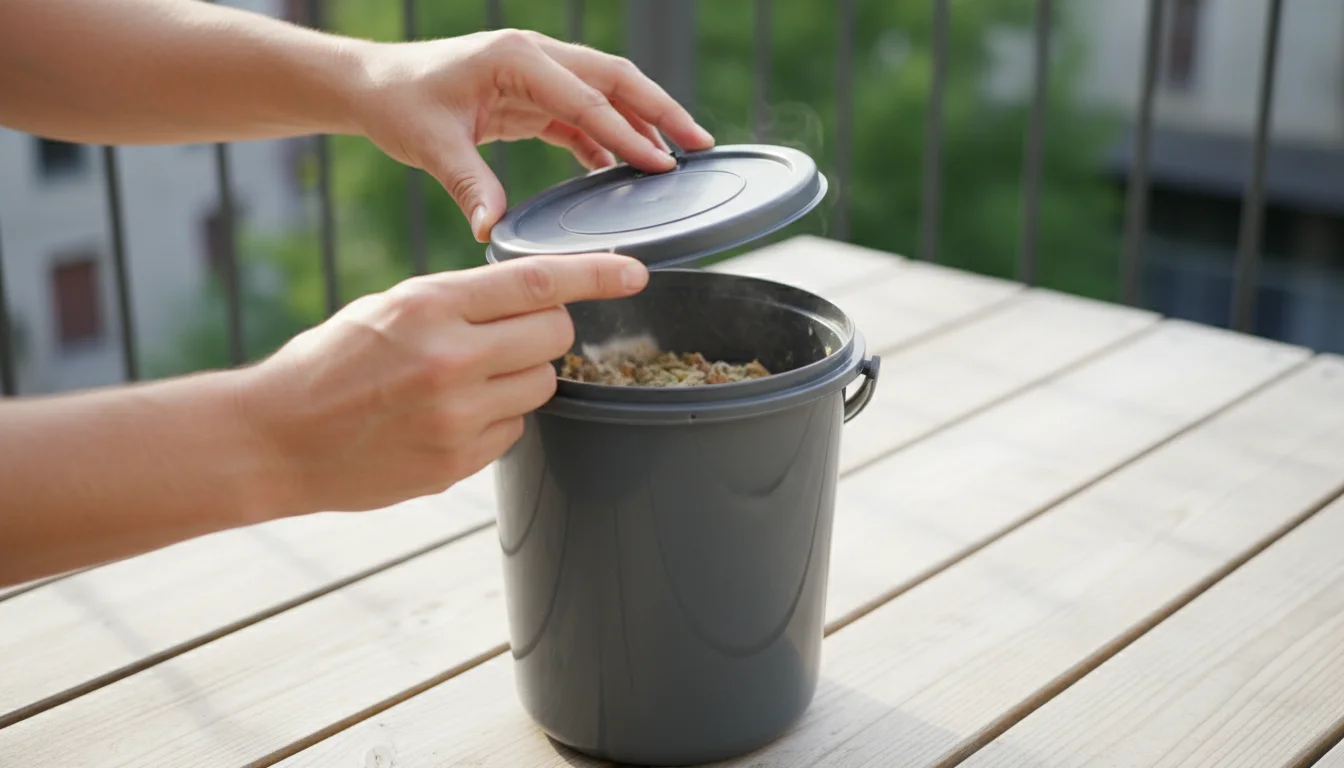
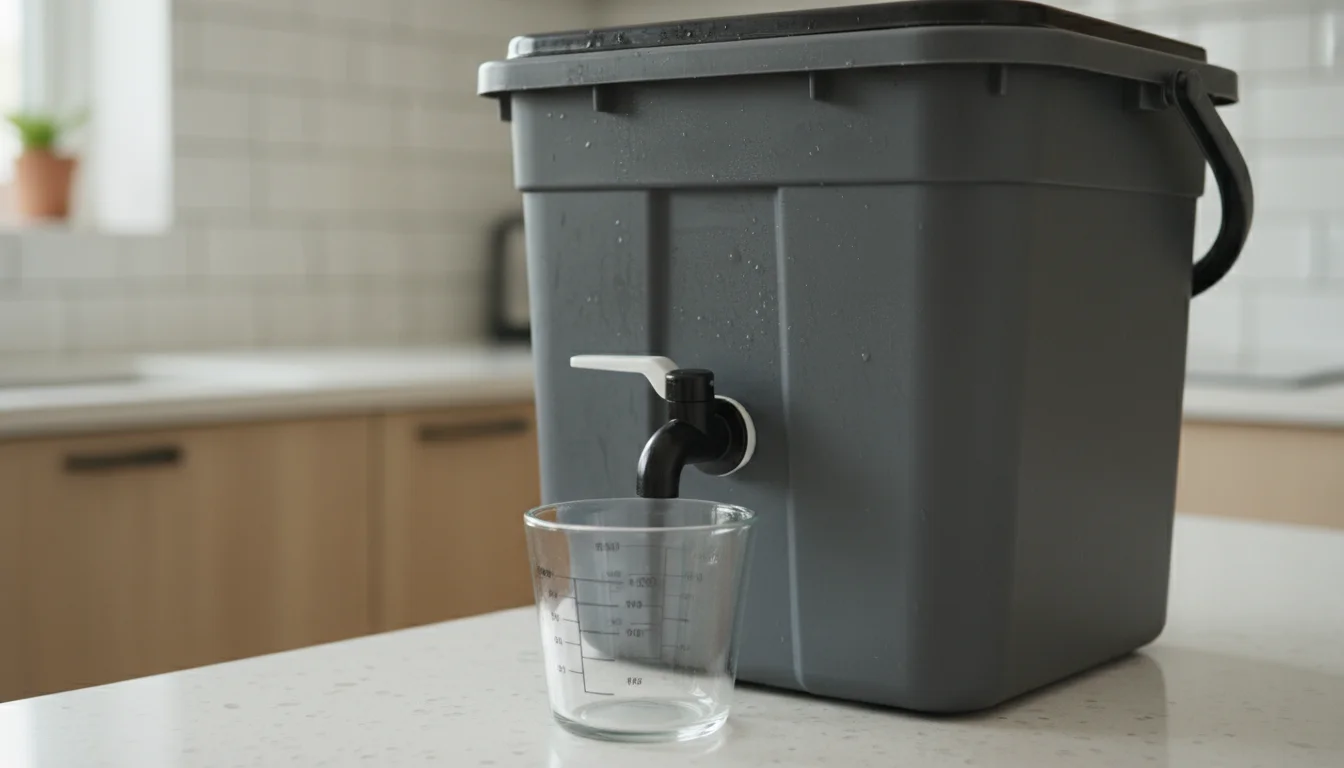
- Bokashi Bucket: You need a sealed container, typically 5 gallons (20 liters) in size. Commercial bokashi buckets usually feature a false bottom and a spigot to drain leachate. If making your own, use two buckets: one solid bucket, and a second bucket with holes drilled in its bottom, placed inside the first. This creates a reservoir for the bokashi tea. Ensure both have tight-fitting lids.
- Bokashi Bran: This is the crucial ingredient. Bokashi bran consists of a carbon-rich material (like wheat bran or sawdust) inoculated with Effective Microorganisms (EM). You can buy it online or at garden supply stores. Ensure it is fresh and smells slightly sweet, like fermentation or molasses.
- Presser/Masher: A plate, a dedicated presser tool, or even an old potato masher works well. This helps compress the food scraps and remove air.
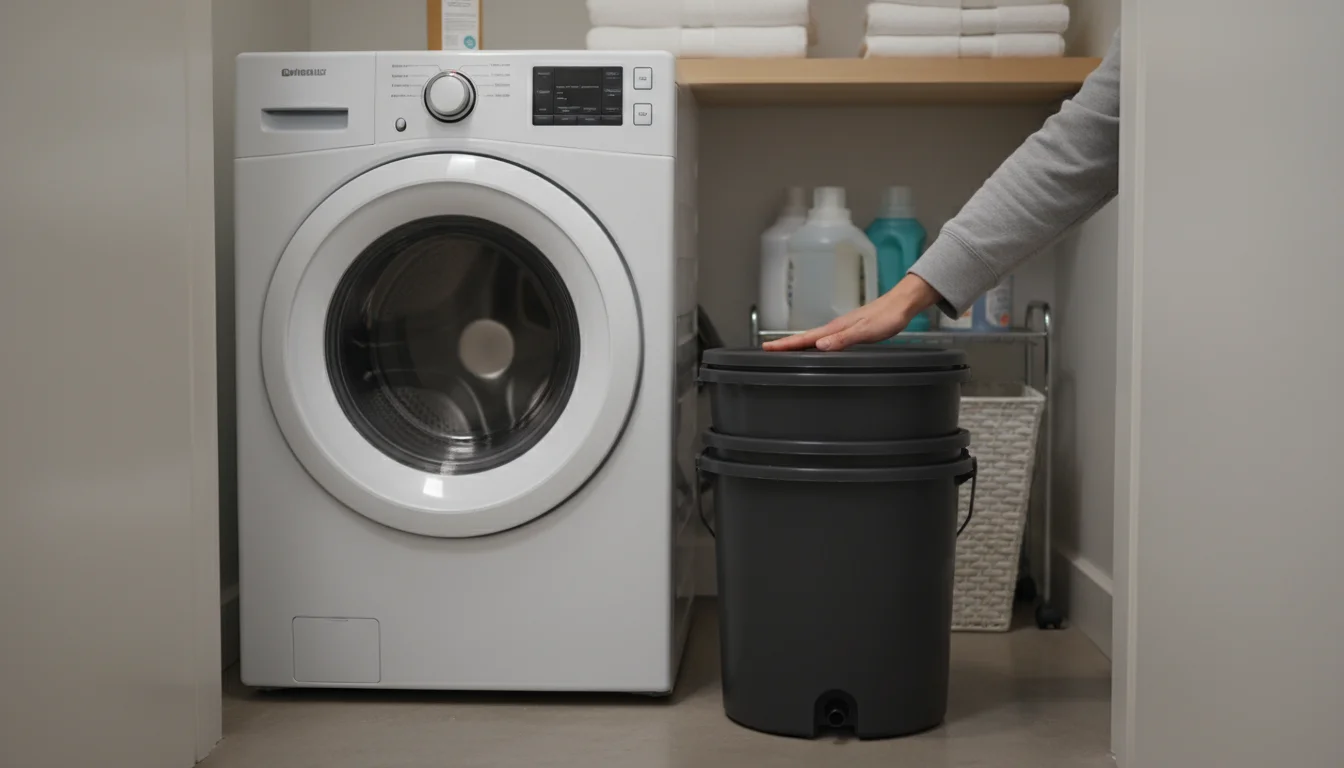
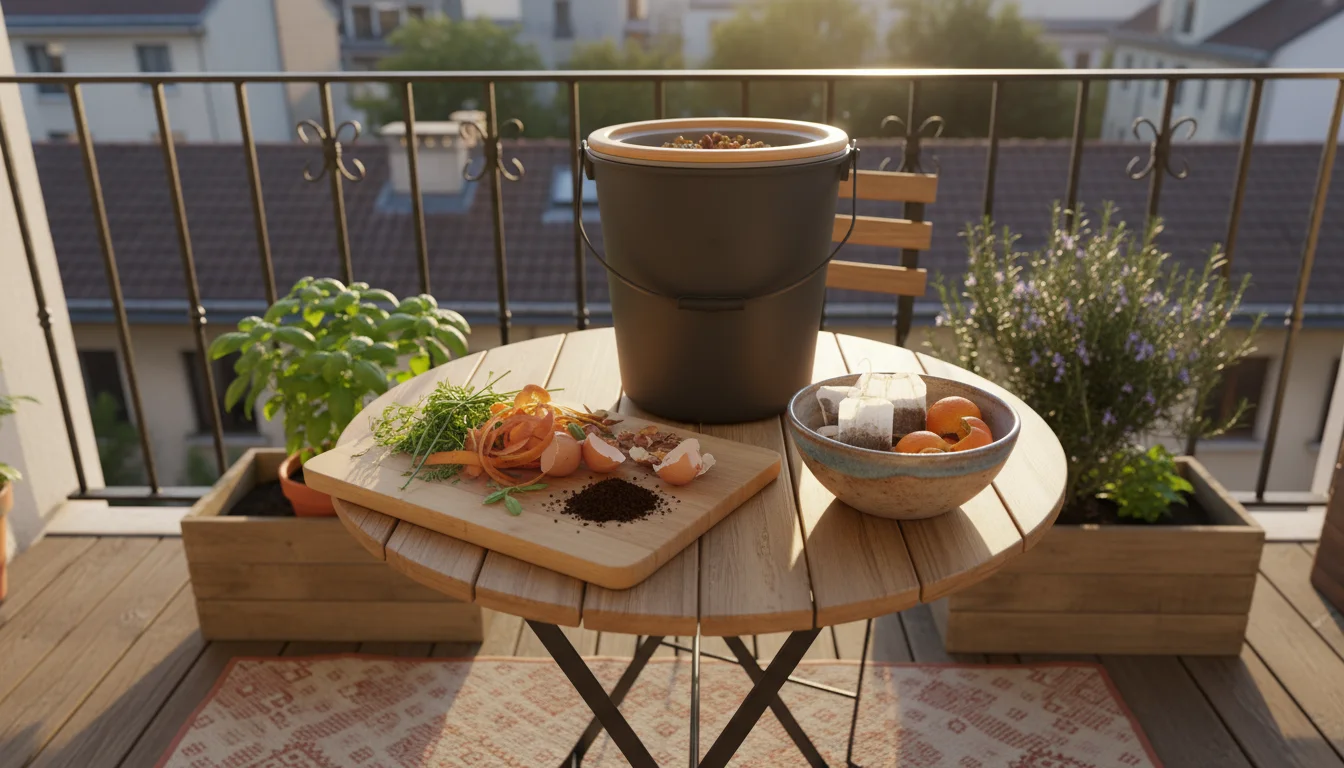
Choosing Your Setup Location:
Select a location that is convenient and maintains a relatively stable, room temperature. A kitchen cupboard, pantry, laundry room, or even a corner of your balcony (if protected from extreme heat or cold) works well. Avoid direct sunlight, which can cause the bucket to overheat and hinder microbial activity. The sealed nature of the `bokashi compost` means odors are not an issue, allowing for flexible placement in your home.
Step-by-Step Assembly:
- Prepare Your Bucket: If using a commercial bokashi system, ensure the false bottom is properly seated and the spigot is closed. If creating a DIY system, place the drilled bucket inside the solid outer bucket.
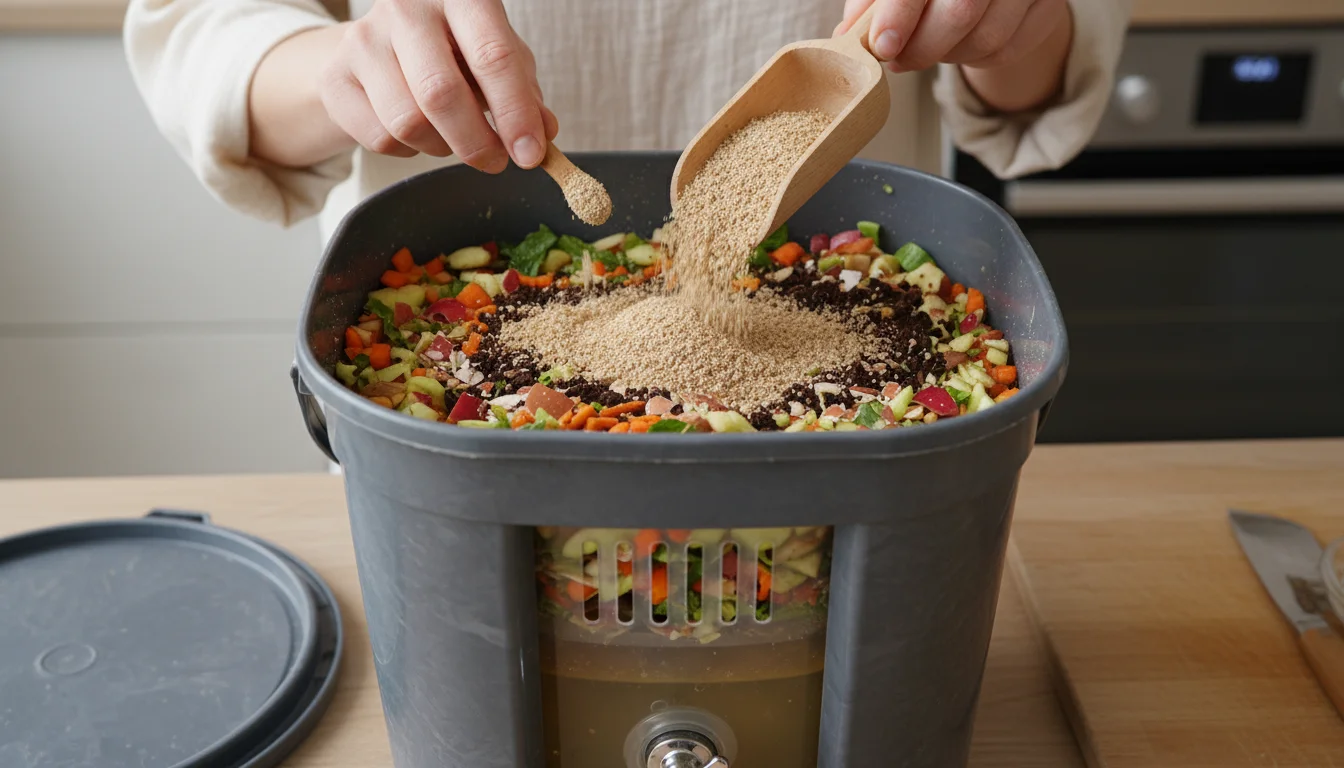
- First Layer of Bran: Sprinkle a generous layer (about 1-2 tablespoons) of bokashi bran evenly over the bottom of the inner bucket. This creates a strong microbial base for your incoming `small kitchen compost` scraps.
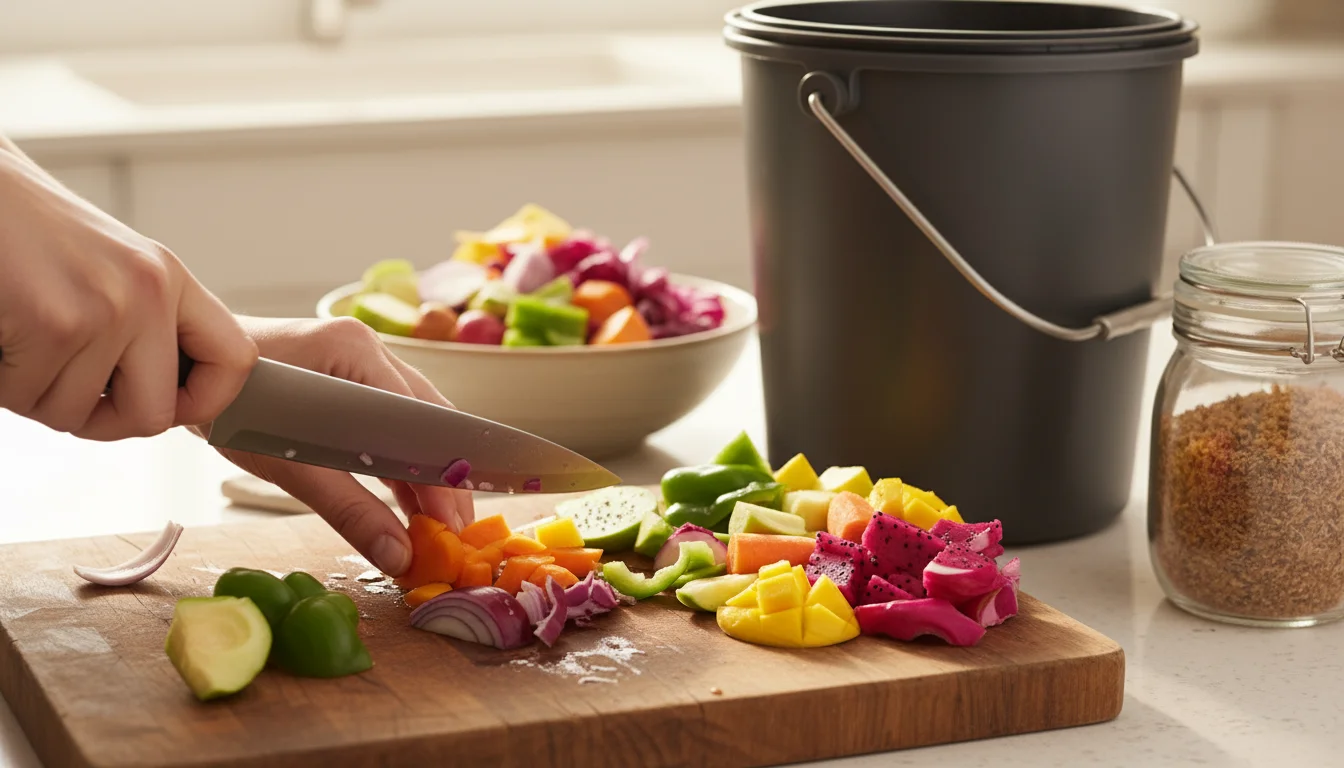
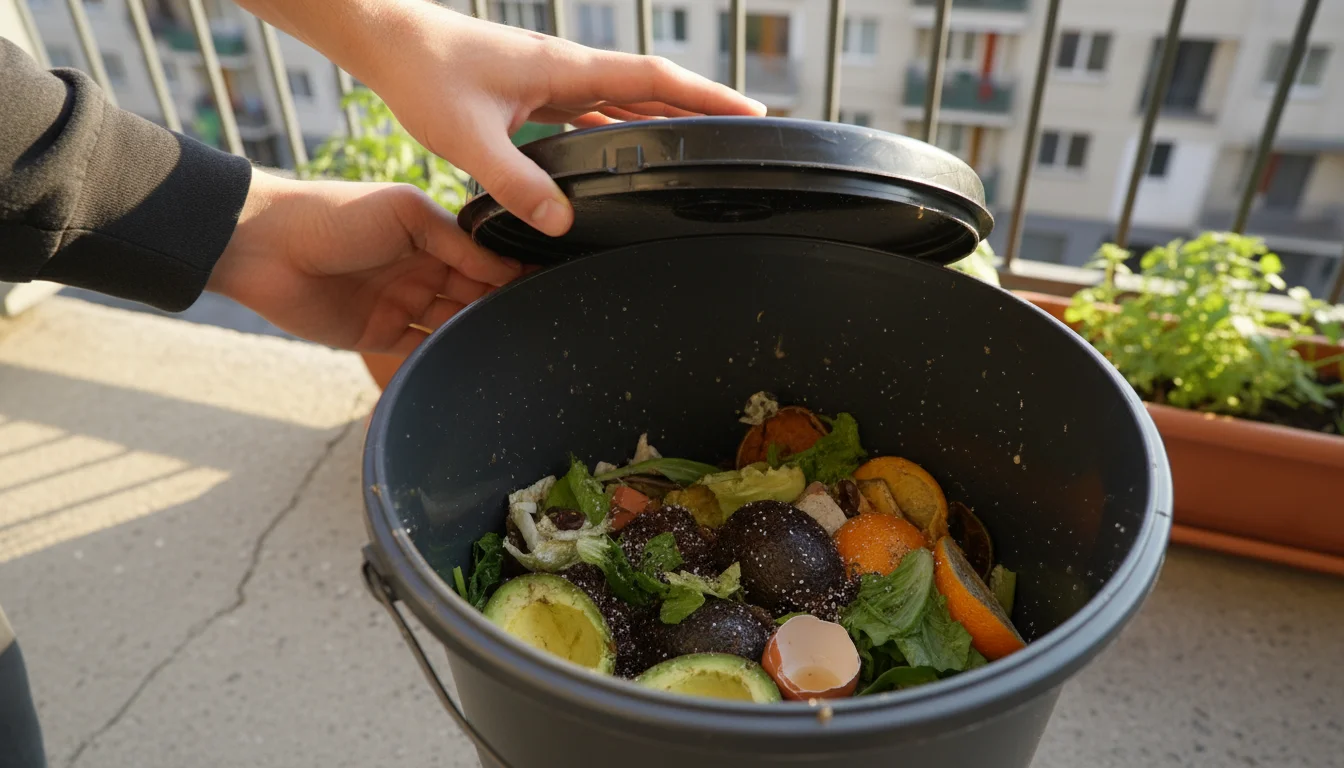
- Add Your First Scraps: Begin adding your food scraps, ensuring they are chopped into small pieces (1-2 inches/2.5-5 cm). Distribute them evenly over the bran layer.
- Layer with More Bran: After adding a layer of scraps, sprinkle another 1-2 tablespoons of bokashi bran over the top. The ratio of bran to scraps is crucial for successful fermentation. Generally, you want enough bran to lightly coat the surface of your scraps.
- Compress the Scraps: Use your presser tool or masher to firmly press down the food scraps. This expels air from the bucket, creating the necessary anaerobic environment for the EM to thrive. The more tightly packed, the better the fermentation.
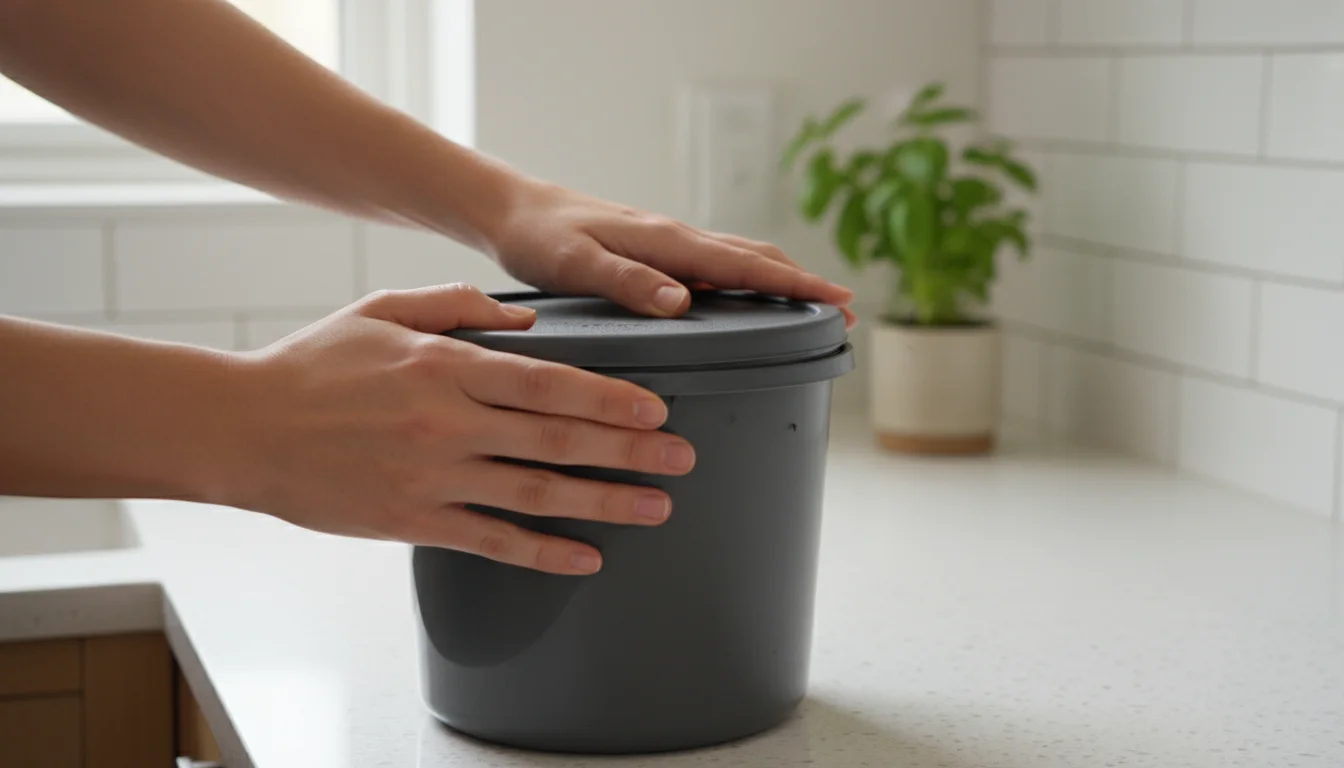
- Seal the Lid Tightly: After each addition, secure the lid firmly. An airtight seal prevents oxygen from entering, which is vital for the fermentation process and prevents unwanted odors or pests.
By following these simple steps, you establish a robust and efficient system for `indoor composting`. You transform your kitchen into a productive hub for sustainability, turning waste into gold for your small-space garden.
The Daily Bokashi Routine: Adding Your Food Scraps
Integrating `bokashi compost` into your daily kitchen routine is surprisingly straightforward and requires minimal effort. Consistency in how you add and manage your food scraps ensures a successful fermentation process, yielding nutrient-rich pre-compost for your garden.
Adding Scraps to Your Bokashi Bucket:
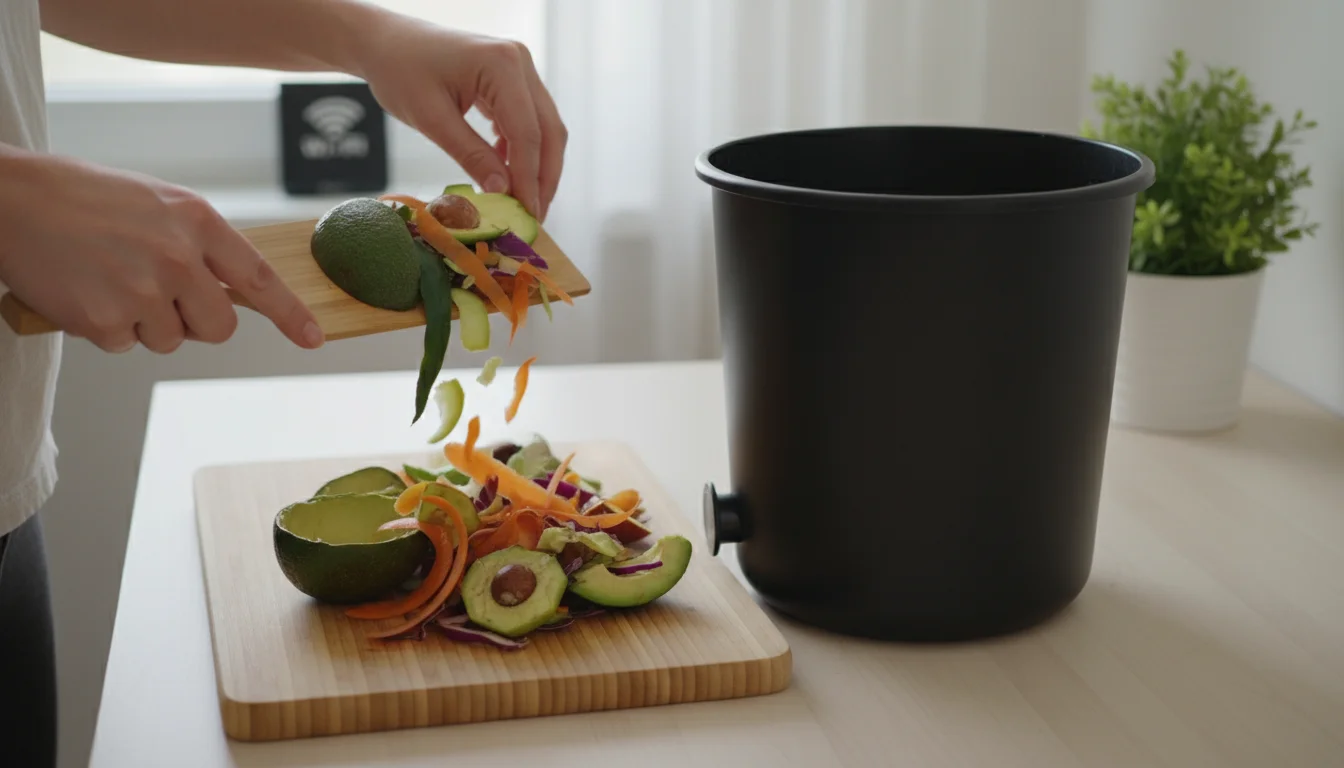
- Collect Your Scraps: Keep a small bowl or container on your kitchen counter to collect food scraps throughout the day. This prevents frequent trips to the bokashi bucket and keeps your kitchen tidy.
- Chop into Small Pieces: Before adding to the bucket, ensure all food scraps are chopped into pieces no larger than 1-2 inches (2.5-5 cm). Smaller pieces ferment faster and pack more efficiently, maximizing the bucket’s capacity.
- Open, Add, Sprinkle: Open the bokashi bucket, add your prepared scraps in an even layer, and then sprinkle 1-2 tablespoons of bokashi bran over the top. The amount of bran can vary slightly depending on the volume and type of scraps; fattier or meatier scraps might benefit from a bit more bran.
- Compress Firmly: Use your presser to push down on the scraps, removing as much air as possible. A tight compaction ensures anaerobic conditions, which are essential for the fermentation process.
- Seal Tightly: Immediately re-seal the lid on your bokashi bucket. Maintaining an airtight environment is critical for preventing aerobic decomposition (which leads to bad odors) and fostering the beneficial microbes.
You can add scraps daily or every few days, depending on how quickly your household generates food waste. Some people prefer to collect scraps for a few days in a sealed container and then add a larger batch to the bokashi bucket at once. Consistency in sealing and compressing remains key.
Draining Bokashi Tea:
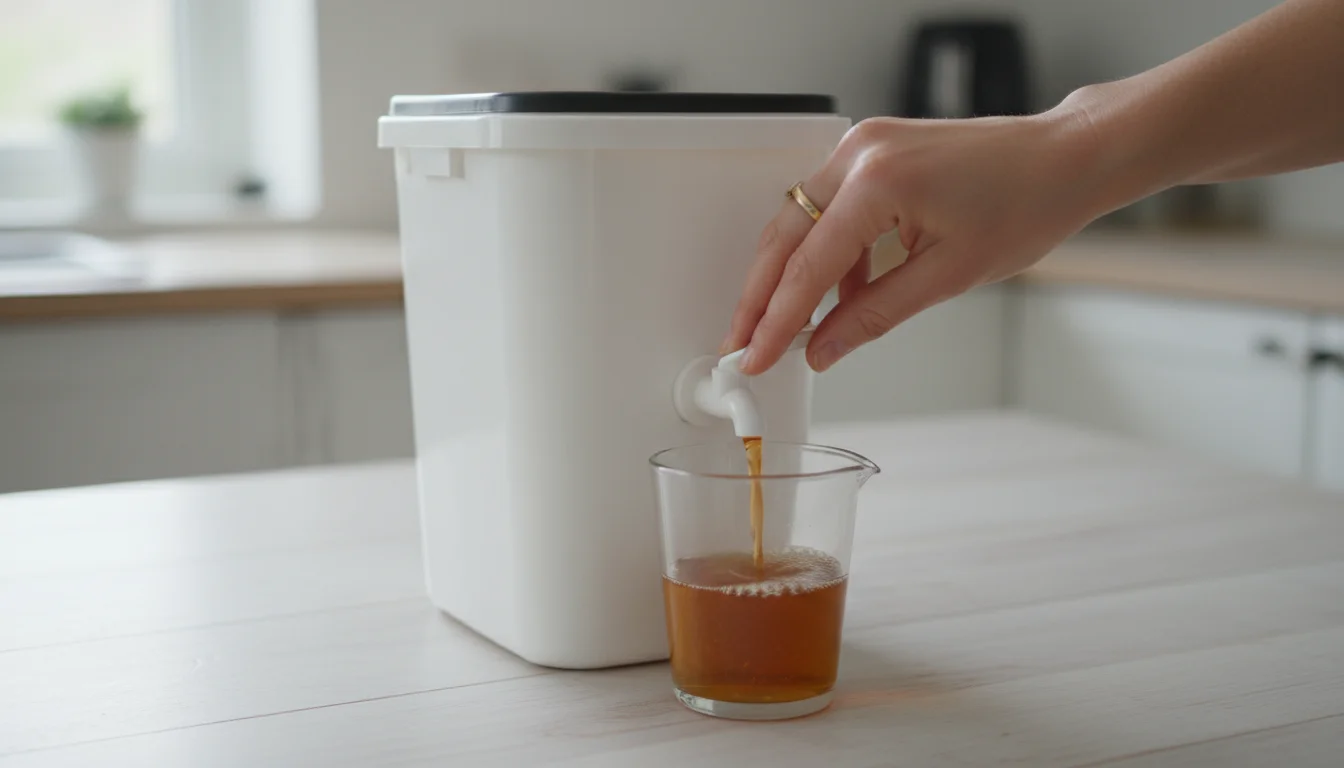
As the food scraps ferment, liquid, known as “bokashi tea” or “fermentation leachate,” accumulates at the bottom of the bucket. This liquid is a valuable byproduct:
- Drain Regularly: If your bucket has a spigot, drain the tea every 2-3 days, especially if you add a lot of moist scraps. If using a DIY two-bucket system, you will need to lift the inner bucket to pour out the liquid.
- Use as Fertilizer: Dilute the bokashi tea with water (a common ratio is 1:100 for indoor plants or seedlings, and 1:50 for established outdoor plants). Use it to water your plants, providing them with a nutrient boost and beneficial microbes. Do not apply undiluted tea to plants, as it can be too acidic and strong.
- Drain Cleaner: Undiluted bokashi tea can also be poured down drains. The microbes help break down grease and other organic buildup, acting as a natural, eco-friendly drain cleaner and odor reducer.
The Fermentation Period:
Once your bokashi bucket is full of food scraps, stop adding new material. Ensure you add a final layer of bran, compress it, and seal the lid tightly. Then, set the full bucket aside in a cool, dark place to ferment for at least two weeks. During this time, the microbes complete their work, transforming the scraps into pre-compost. You may notice the bucket sides bulging slightly due to gas production, which is normal. After the two-week fermentation, your `bokashi compost` is ready for the next stage: incorporating it into your garden.
Following this routine diligently ensures a continuous and successful `indoor composting` system, making the most of your `small kitchen compost` and significantly reducing household waste.
Harvesting and Using Bokashi Pre-Compost
After the two-week fermentation period, your bokashi bucket contains “pre-compost.” This material does not look like traditional soil compost; it still resembles the original food scraps but has undergone a significant microbial transformation. It possesses a distinct pickled smell, not rotten. This fermented material now needs to be integrated into soil to complete its breakdown and release its full nutritional potential.
Methods for Using Bokashi Pre-Compost:
You have several practical options for utilizing your finished `bokashi compost`, each suited to different gardening scenarios:
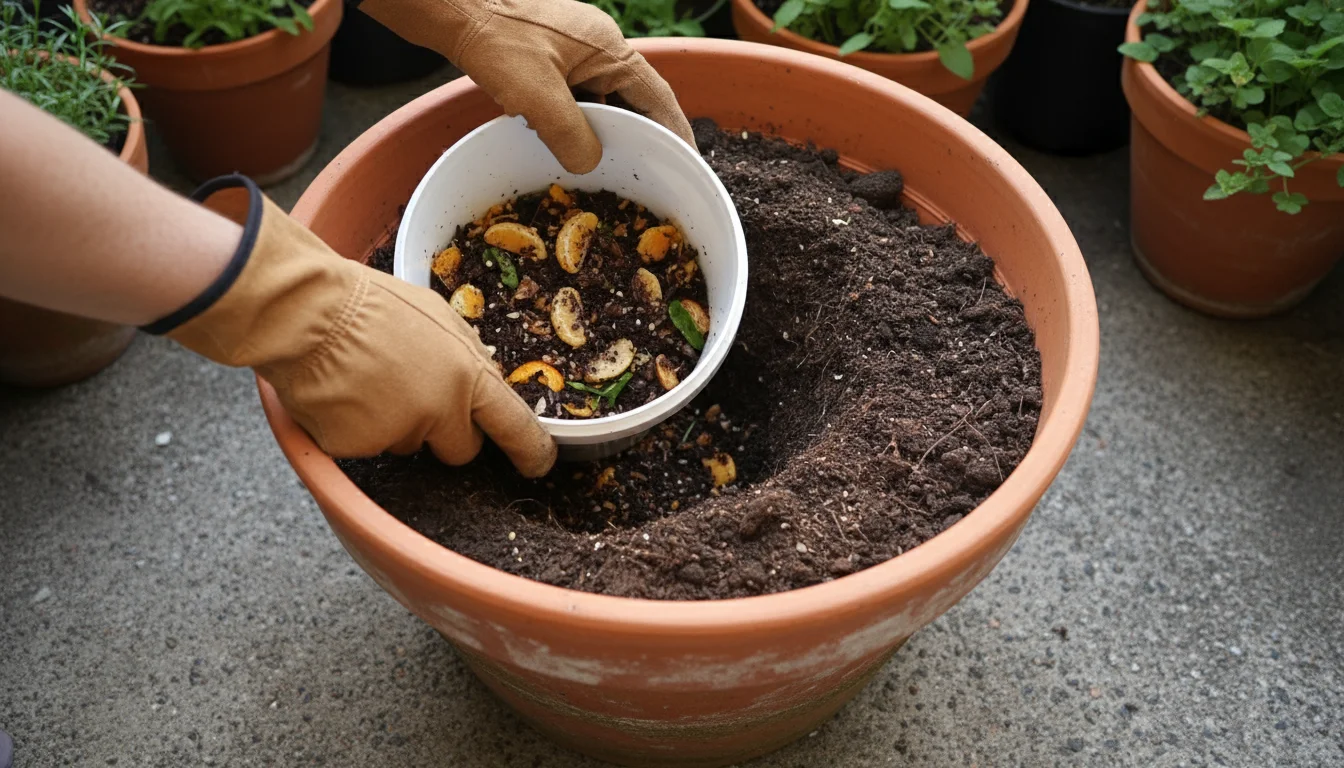
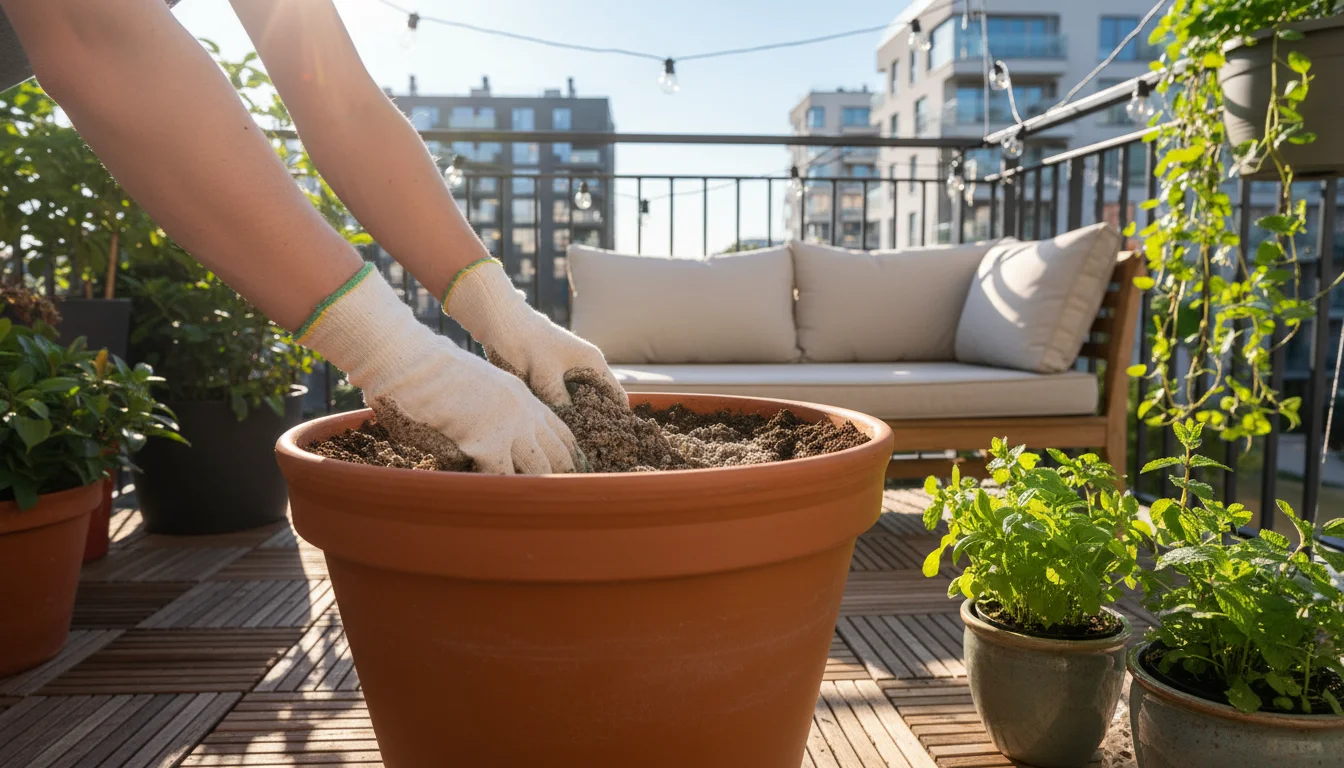
1. Direct Burial in Garden Beds:
- Dig a Trench: Dig a trench or a series of holes in your garden bed, about 6-8 inches (15-20 cm) deep. Ensure the location is away from the immediate root zones of sensitive plants, as the material is initially acidic.
- Add Bokashi and Cover: Empty the fermented bokashi scraps into the trench or holes. Cover completely with at least 6 inches (15 cm) of soil.
- Wait Before Planting: Allow at least two weeks (preferably four) for the bokashi to fully break down in the soil before planting directly into that spot. This “curing” period allows the pH to neutralize and the decomposition process to finish, preventing any potential root burn.
This method works excellently for established gardens and is a fantastic way to revitalize depleted soil. The microbes from the bokashi continue their work, enriching your garden soil with a burst of nutrients and beneficial organisms.
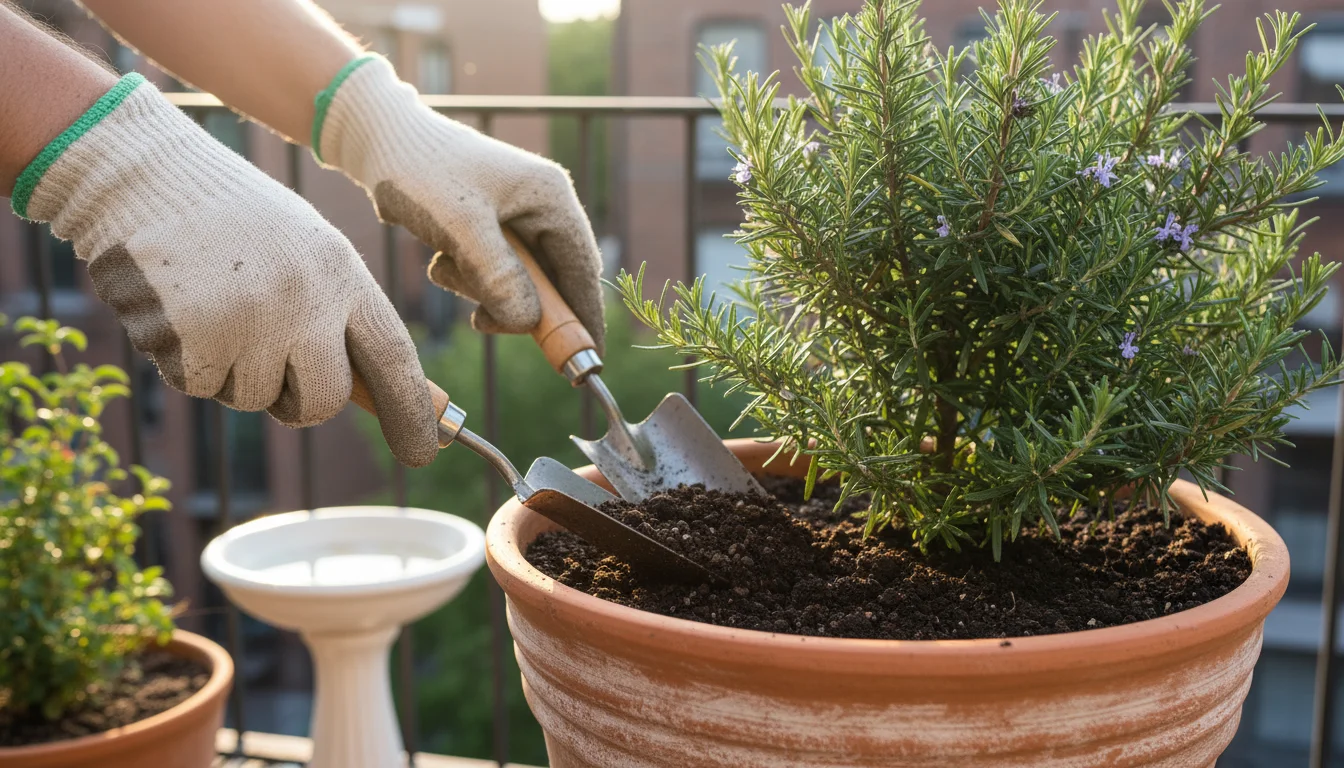
2. Mixing with Potting Soil for Containers:
- Create a Soil Mix: If you container garden, you can create a super-rich potting mix. In a separate container (like a large bin or tarp), mix one part bokashi pre-compost with 5-10 parts potting soil or garden soil.
- Cure the Mix: Allow this mixture to sit for at least two weeks, moistening it slightly and turning it occasionally. This curing process ensures the bokashi integrates fully and the pH stabilizes, making it safe for delicate plant roots.
- Use for Planting: After curing, this enriched soil mixture is ready to use in your pots and containers. It provides a slow-release source of nutrients, vital for small-space plants.
This method is ideal for revitalizing tired potting soil or creating a nutrient powerhouse for new container plantings. It gives your container plants a significant advantage, promoting vigorous growth and flowering.
3. Incorporating into Traditional Compost Bins:
- Boost Your Compost Pile: If you maintain an outdoor compost bin or pile, you can add your `bokashi compost` directly to it. The fermented scraps accelerate the decomposition process in your traditional compost, acting as a “booster.”
- Bury It: Dig a hole in the middle of your active compost pile and bury the bokashi pre-compost. Cover it with existing compost material.
The beneficial microbes from the bokashi introduce a powerful microbial workforce to your compost pile, helping to break down other organic matter more efficiently. This can significantly speed up the overall composting time.
When using `indoor composting` products on plants you plan to eat, ensure a proper curing period to allow the material to fully integrate and sanitize within the soil ecosystem. This practice ensures both plant health and food safety. By effectively utilizing your bokashi pre-compost, you close the loop on your `small kitchen compost` waste, turning it into a powerful asset for your sustainable garden.
Troubleshooting Common Bokashi Problems
While `bokashi compost` is generally a straightforward and forgiving `indoor composting` method, occasional issues can arise. Understanding how to identify and address these problems ensures your system runs smoothly and effectively. Most issues stem from not maintaining anaerobic conditions or using incorrect materials.
Problem 1: Foul, Putrid Odor
- Symptom: A strong, rotten, putrid smell that is distinctly unpleasant, unlike the sweet-sour pickling smell. This indicates aerobic decomposition, meaning oxygen has entered the bucket.
- Cause:
- Lid not sealed tightly.
- Not enough bokashi bran used.
- Too much liquid in the bucket.
- Poor compaction of scraps, leaving air pockets.
- Too many “avoid” items, like heavily moldy food or excessive liquids.
- Solution:
- Re-seal the lid: Check the lid for a tight fit. If using a DIY bucket, ensure the inner bucket is firmly pressed down and the outer lid is secure.
- Add more bran: Sprinkle a generous amount of fresh bokashi bran (2-3 tablespoons) over the contents.
- Drain liquid: If there is excessive liquid, drain it immediately.
- Compress better: If adding new scraps, ensure you press them down firmly to remove air.
- Bury the batch: If the smell persists and the batch seems ruined, consider burying the contents deeply in a non-food garden area or disposing of it to prevent contamination of future batches. You can also re-inoculate with bran and let it ferment longer.
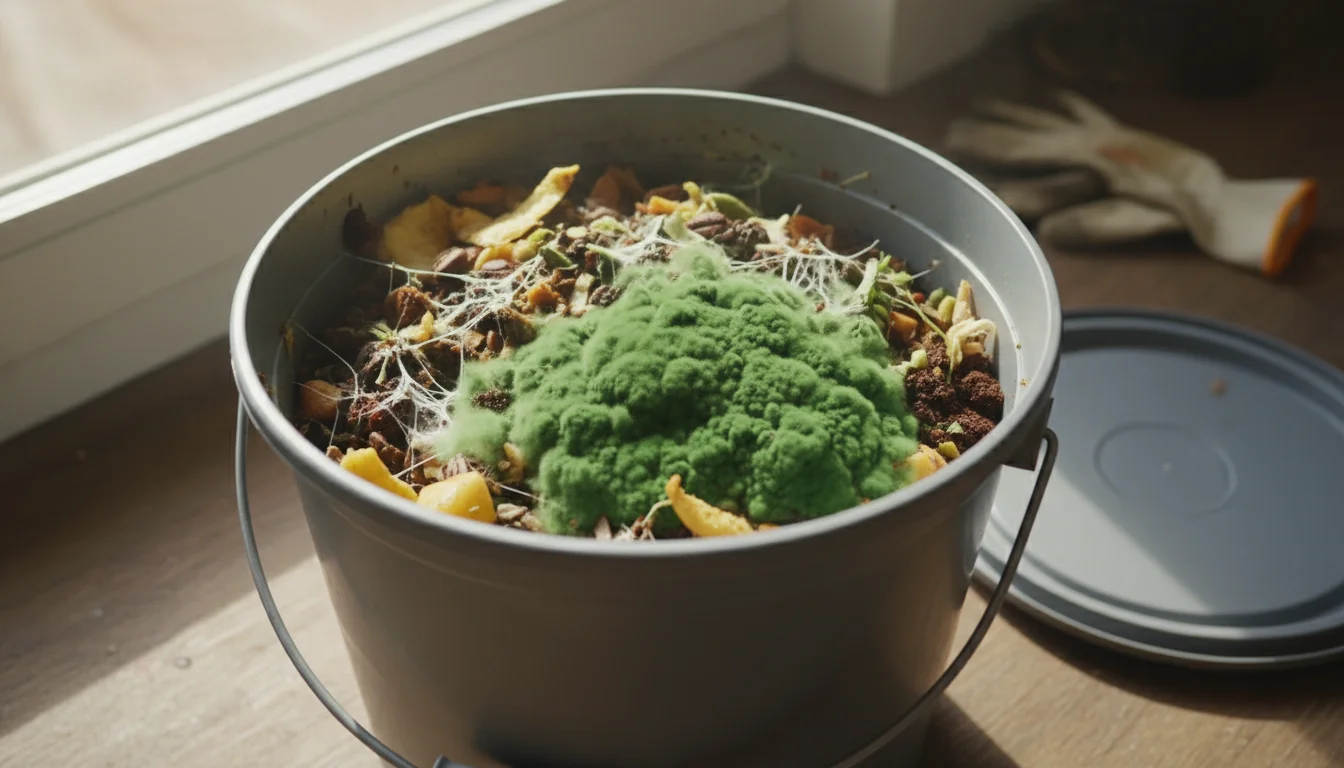
Problem 2: Black or Green Mold
- Symptom: Presence of black, green, or fuzzy blue mold. White, web-like mold is normal and indicates healthy fermentation.
- Cause:
- Oxygen exposure due to an unsealed lid.
- Adding food that was already heavily moldy or rotten.
- Too much moisture in the bucket.
- Solution:
- Assess the damage: If it’s a small patch of bad mold, you might be able to remove it, add more bran, and re-seal.
- Dispose if severe: If the bucket is largely covered in black or green mold, the fermentation has failed. It is best to dispose of the contents in a non-food composting area or the trash. Clean and sanitize the bucket thoroughly before starting a new batch.
Problem 3: Not Enough Bokashi Tea
- Symptom: Minimal or no liquid draining from the spigot.
- Cause:
- Mostly dry scraps (bread, pasta, dry veggies).
- Not enough fermentation time.
- Solution:
- This is often not a problem. If your scraps are relatively dry, less liquid will naturally be produced. The fermentation can still be successful.
- If you desire more tea, consider adding more moist scraps in future batches.
- Ensure the spigot is not clogged.
Problem 4: Fruit Flies or Other Pests
- Symptom: Presence of fruit flies or other insects around the bucket.
- Cause:
- Lid not sealed tightly.
- Scraps exposed to air.
- Pests attracted to the fermentation smell.
- Solution:
- Tighten the lid: This is the most common cause. Ensure the lid forms an airtight seal.
- Clean exterior: Wipe down the outside of the bucket to remove any spills or residues that might attract pests.
- Address entry points: If you are using a DIY system, ensure any gaps are sealed.
By promptly addressing these common `bokashi compost` issues, you maintain an efficient and pleasant `indoor composting` system. Do not get discouraged by minor setbacks; they offer learning opportunities. With practice, you will become adept at managing your `small kitchen compost` with confidence and success.
Frequently Asked Questions
How long does the bokashi process take?
The active fermentation in the bucket takes about two weeks once it is full and sealed. After this, you need another two to four weeks for the fermented pre-compost to fully break down in the soil after burial. So, from kitchen scrap to soil enrichment, the entire process typically spans four to six weeks.
Can I add citrus peels to my bokashi bucket?
Yes, you can add citrus peels to your bokashi bucket. Unlike traditional worm composting where citrus can be problematic due to its acidity and d-limonene content, bokashi’s anaerobic fermentation process handles citrus well. Chop them into smaller pieces for faster fermentation.
What if I go on vacation?
Bokashi is very forgiving. If your bucket is full, simply ensure the lid is tightly sealed and leave it to ferment while you are away. The fermentation will continue for the required two weeks. If the bucket is partially full, stop adding scraps, add a final layer of bran, press down, and seal. The longer it sits, the more completely it will ferment. You can resume adding scraps to a new bucket upon your return or start the post-fermentation soil burial process for the batch you left.
Is bokashi compost safe to use on edible plants?
Yes, bokashi pre-compost is safe to use on edible plants, but it requires a curing period in the soil. When you bury the fermented scraps, allow at least two weeks (preferably four) for them to fully integrate and break down in the soil before planting edibles in that exact spot. This ensures the pH neutralizes and any remaining acidity from the fermentation process does not harm plant roots. The beneficial microbes also help sanitize the material during this soil integration phase.
Can I make my own bokashi bran?
Yes, you can make your own bokashi bran, though it requires sourcing the Effective Microorganisms (EM) liquid culture. You typically mix a carbon source like wheat bran or sawdust with the EM liquid and a sweetener like molasses, then allow it to ferment for a few weeks in an anaerobic environment. Many online tutorials and recipes are available if you are interested in a DIY approach.